Lexus NX: Head restraints
Head restraints are provided for all seats.
WARNING
■Head restraint precautions Observe the following precautions regarding the head restraints.
Failure to do so may result in death or serious injury.
- Use the head restraints designed for each respective seat.
- Adjust the head restraints to the correct position at all times.
- After adjusting the head restraints, push down on them and make sure they are locked in position.
- Do not drive with the head restraints removed.
Vertical adjustment
■ Front seats
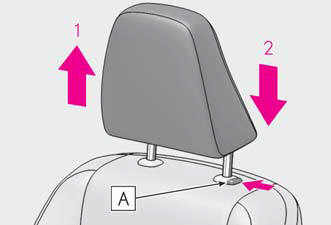
- Up
Pull the head restraints up.
- Down
Push the head restraint down while pressing the lock release button A.
■ Rear seats
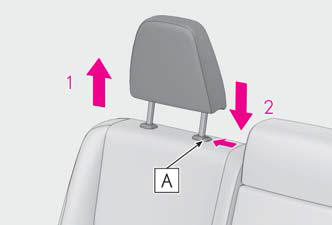
- Up
Pull the head restraints up.
- Down
Push the head restraint down while pressing the lock release button A.
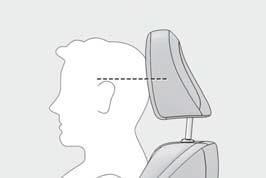
■Adjusting the height of the head restraints Make sure that the head restraints are adjusted so that the center of the head restraint is closest to the top of your ears.
■Adjusting the center rear seat head restraint Always raise the head restraint one level from the stowed position when using.
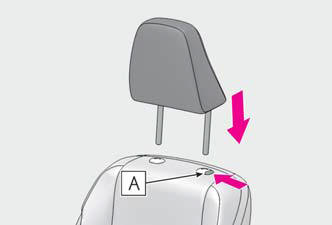
Removing the head restraints
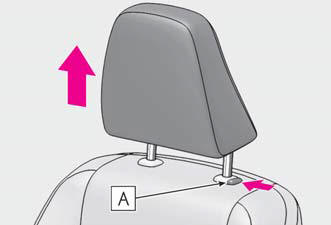
Pull the head restraint up while pressing the lock release button A.
If the head restraint touches the ceiling, making the removal difficult, change the seat height or angle.
Installing the head restraints
Align the head restraint with the installation holes and push it down to the lock position.
Press and hold the lock release button A when lowering the head restraint.
READ NEXT:
 Steering wheel
Adjustment procedure
Manual type
1. Hold the steering wheel and push
the lever down.
2. Adjust to the ideal position by moving
the steering wheel horizontally
and vertically.
After adjustme
Inside rear view mirror
The rear view mirror's position can
be adjusted to enable sufficient
confirmation of the rear view.
Adjusting the height of rear view
mirror
The height of the rear view mirror can
be adjusted to
SEE MORE:
Installation
INSTALLATION PROCEDURE 1. INSTALL THEFT WARNING ULTRASONIC SENSOR (a) Attach the 4 clamps to install the theft warning ultrasonic sensor. (b) Install the 6 screws and connect the connector. 2. INSTALL MAP LIGHT ASSEMBLY Click here 3. CONNECT CABLE TO NEGATIVE AUXILIARY BATTERY TERMINAL 4. INITIALI
Touch Pad Sensor Malfunction (B1559)
DESCRIPTION This DTC is stored if the remote operation controller assembly (remote touch) detects a malfunction in itself, such as internal hardware failure or touch pad sensor malfunction. DTC No. Detection Item DTC Detection Condition Trouble Area B1559 Touch Pad Sensor Malfunction
